
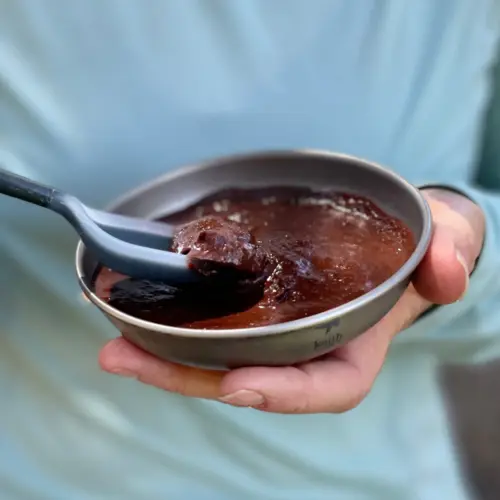
Craving something sweet on the trail? After miles of dirt, sweat, and freeze-dried meals, a creamy dessert can feel downright luxurious. This cold soak tiramisu isn’t just any backpacking dessert recipe—it’s lightweight, satisfying, and one of the best dessert ideas for backpacking after a long day on the trail.
With the rich texture of pudding, a subtle kick of coffee, and the soft crunch of cookie crumbles, it delivers real trail comfort—without a stove, fuel, or cleanup.
Table of Contents
- Why Trailside Tiramisu Is the Best Backpacking Dessert
- What’s Inside: Trail-Ready Ingredients That Actually Taste Good
- Recipe: Home & Field Prep Instructions
- Make It Your Own: Easy Swaps for Dietary Needs
- Mistakes to Avoid (So You Don’t End Up with Trail Pudding Soup)
- More Dessert Ideas for Backpacking (When One Just Isn’t Enough)
- FAQs: Best Backpacking Dessert Recipes
- Take This Recipe — and More — on Your Next Adventure
Why Trailside Tiramisu Is the Best Backpacking Dessert
When pack space is tight and calories matter, dessert usually doesn’t make the cut. But this isn’t just any sweet—it’s a lightweight dessert for hiking that hits the perfect balance of simplicity, satisfaction, and smart nutrition.
What makes it one of the best backpacking desserts?
- No stove required – Just add cold water, shake, and let it sit.
- High-calorie density – This lightweight dessert for hiking packs over 300 calories at 127 cal/oz, it pulls its weight.
- Trail-tested ingredients – Instant pudding, milk powder, and crushed cookies pack well, mix easily, and taste amazing.
- Morale boost – It’s not just fuel; it’s something to look forward to after a long day.
This is one of those recipes that hikers actually save for the hard days. It’s comfort food that earns its keep.
Whether you’re out for a weekend or logging big miles on a thru-hike, this backpacking dessert recipe proves that trail treats don’t have to be heavy or high-maintenance.
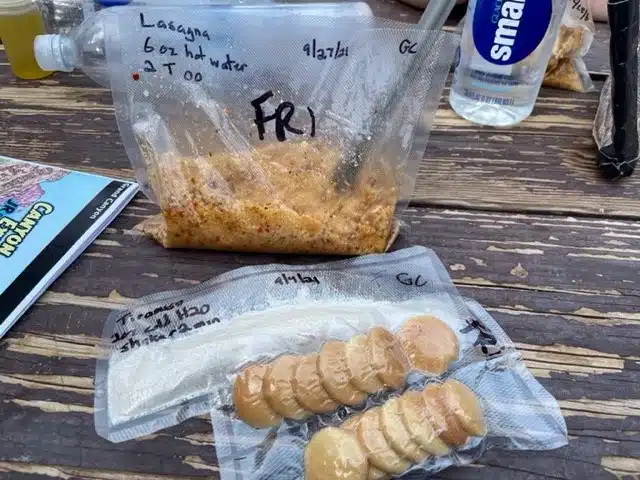
If you’ve ever made tiramisu at home, you know it’s a multi-step process. That’s not so with this backpacking dessert recipe. All you need is a zipper-top freezer baggie. Combine all the ingredients at home, package them for the trail, and then add water and shake when it’s time to indulge. Easy peasy!
What’s Inside: Trail-Ready Ingredients That Actually Taste Good
This cold soak dessert skips the eggs, mascarpone, and ladyfingers—and instead uses smart, packable swaps that still deliver that creamy-coffee-crunch vibe.
Ingredients:
- Instant vanilla pudding mix
- Whole milk powder (or dairy-free substitute)
- Instant espresso or coffee powder
- Cocoa powder + cinnamon
- Vanilla wafers or graham crackers (stored separately)
Everything (except the wafers) gets mixed into a single resealable bag before your trip. On trail, you’ll just add cold water, shake it up, and let it soak for 5–10 minutes while you set up camp or take a break.
Trail Tip: Want more crunch? Store cookies in a mini hard-sided container, airtight baggie, or add just before leaving for your trip to prevent sogginess. When exposed to air for andextended period of time, the wafers will soften and go stale.
This simple cold soak method keeps your pack light, your prep easy, and your energy up—everything a good backpacking dessert should do.

Recipe: Home & Field Prep Instructions
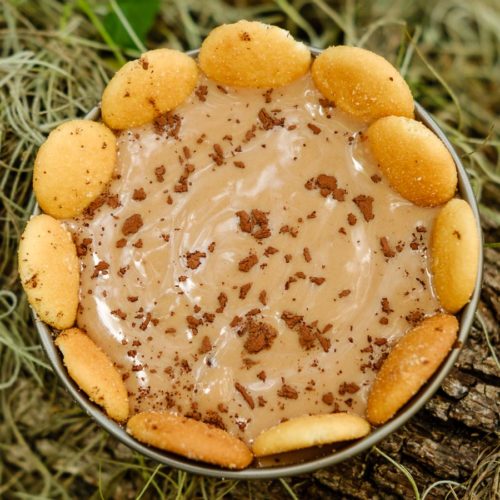
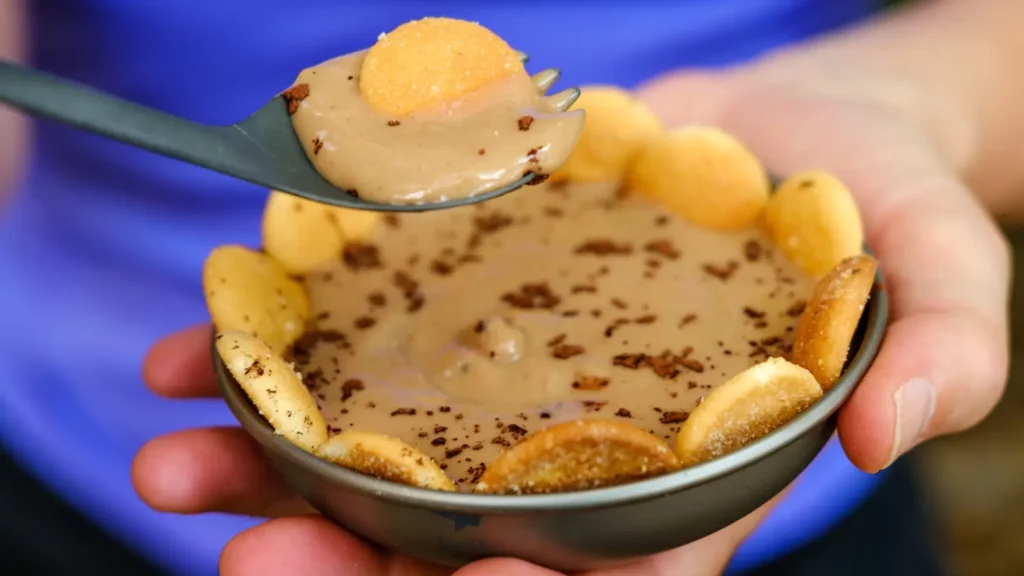
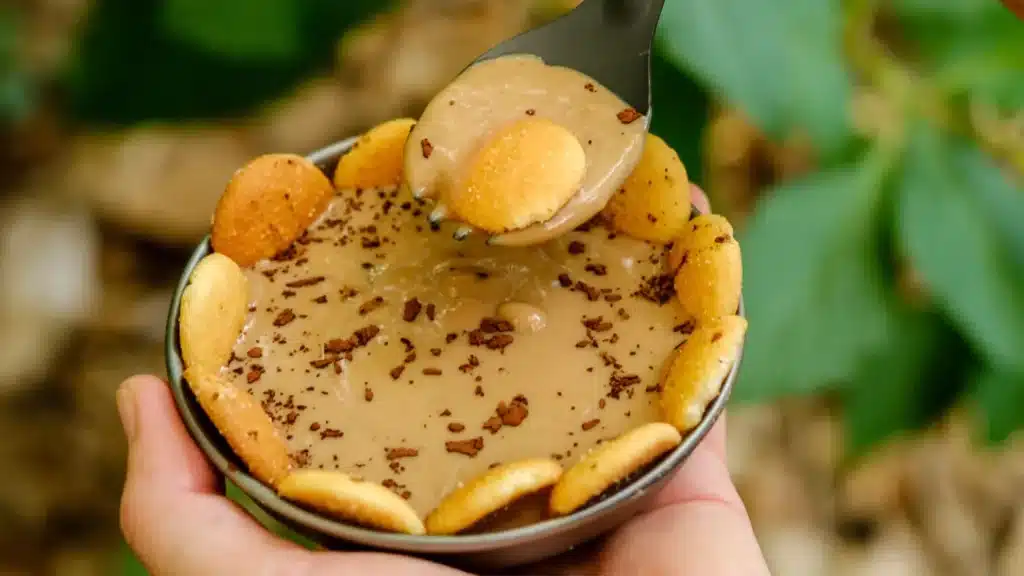
Trailside Tiramisu
Rate This Recipe
View Comments / Leave A ReviewNUTRITION (per serving)
INGREDIENTS
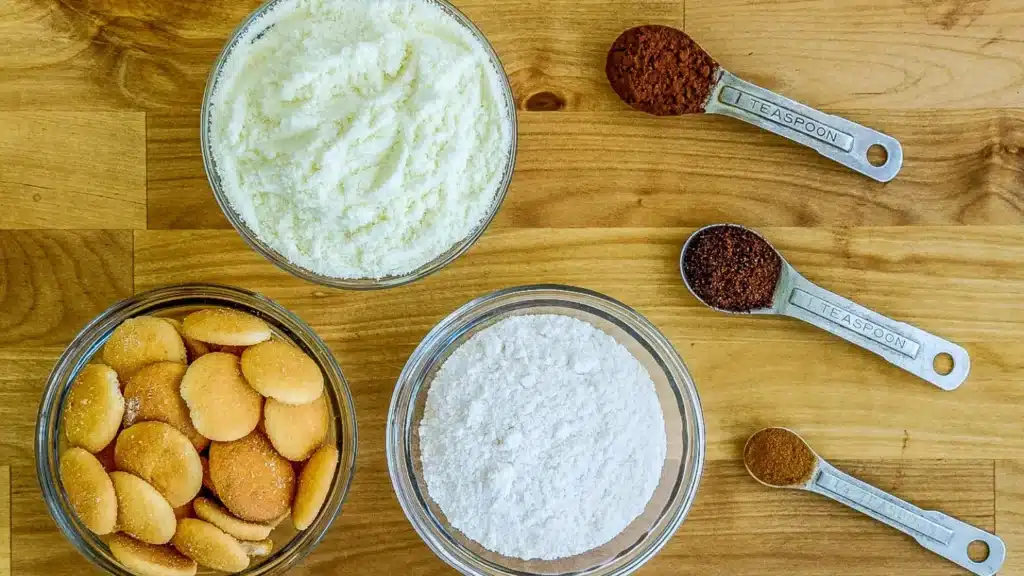
- 1 3.4 oz box (96 g) instant pudding, vanilla
- 1 cup (136 g) milk powder, whole
- 1 tsp (1 g) coffee, instant
- 1 tsp (2 g) cocoa powder, unsweetened
- ¼ tsp (0.7 g) cinnamon, ground
- 40 wafer (60 g) vanilla wafers, mini
- 12 oz (360 mL) water
OPTIONAL
- 1 1 oz box (28 g) instant pudding, sugar-free vanilla (substitution), low-sugar option
- 1 cup (92 g) milk powder, non-fat (substitution), heart-healthy option
- 1 cup (104 g) cashew milk powder (substitution), vegan option
- 20 wafer (90 g) vanilla wafers, gluten-free (substitution), gluten-free option
INSTRUCTIONS (per serving)
HOME
- Put all dry ingredients, except the vanilla wafers, in a mixing bowl. See meal prep tip below.
- Stir to mix well making sure the cocoa and coffee are evenly distributed throughout the mixture.
- Divide the pudding mixture into four equal servings, approximately ⅓ cup each.
- Store the mixture in bags or containers to be used in the backcountry.
- Pack 10 vanilla wafers (15 g), per serving of pudding, in a separate bag or container to be consumed when the pudding is prepared.
FIELD
- Add 3 oz (90 mL) of cold water to the pudding mixture.
- Stir to mix well and shake vigorously for 2 minutes.
- Let stand for approximately 3 minutes or until the desired consistency is achieved. If possible, put the bag or container in cold water or snow to encourage the pudding to thicken further.
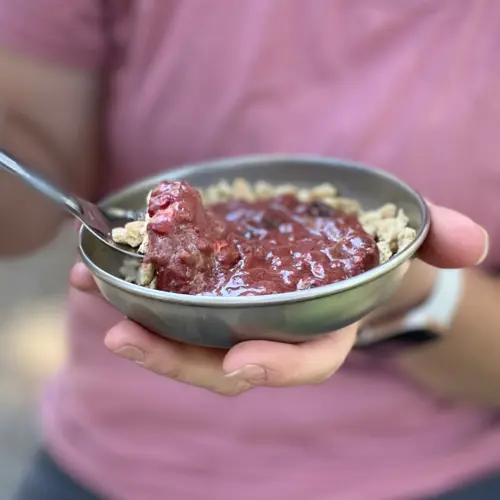
- After thickening, add the vanilla wafers to the pudding mixture.
- Eat by the spoonful and enjoy!
NOTES
MEAL PREP TIP
- The volume of instant coffee needed to reach the desired flavor will vary based on the brand of coffee used.
NUTRITION
- Total sugar (per serving): 37 g, with 13 g added sugar
- For a low-sugar recipe, replace instant pudding with sugar-free instant pudding.
- For a heart-healthy recipe and reduced calories by 90, replace whole milk powder with non-fat milk powder.

Did you enjoy this backpacking dessert recipe?
Pin it and share it with your fellow hikers.
Make It Your Own: Easy Swaps for Dietary Needs
One of the best things about this backpacking dessert recipe is its flexibility. Whether you’re dairy-free, vegan, or just looking to lighten the sugar load, there are easy ways to make it work without compromising flavor or texture.
Here are some trail-tested ingredient swaps:
Milk Powder Options
- Vegan: Use coconut, oat, or cashew milk powder
- Lower fat: Try non-fat milk powder
- Higher calories: MCT powder mixes well with cold water, with minimal change in flavor
Trail tip: Cashew milk powder offers great creaminess and blends well cold.
Cookie Crunch
- Gluten-free: Use gluten-free vanilla wafers or crushed gluten-free graham crackers
- Less sugar: Opt for simple digestive biscuits or low-sugar cookies
- More texture: Pack cookies separately to keep them crunchy
Flavor Boosters
- Add a splash of vanilla extract powder or coffee creamer powder
- Sprinkle in cinnamon, cardamom, or a pinch of salt to enhance richness
With these tweaks, Trailside Tiramisu becomes one of those dessert ideas for backpacking that works across trips, seasons, and dietary needs—whether you’re a beginner packing your first weekend hike or a thru-hiker fine-tuning macros for mile 2,000.
Mistakes to Avoid (So You Don’t End Up with Trail Pudding Soup)
Even the best backpacking desserts can go sideways if a few key details are overlooked. Here’s how to avoid common mistakes with Trailside Tiramisu—and make sure your trail treat turns out as crave-worthy as it sounds.
Rehydrating Too Far in Advance
- The problem: Once milk powder is rehydrated, it’s best consumed within two hours for food safety. Letting it sit longer in warm conditions can increase the risk of spoilage.
The fix: Mix your tiramisu when you’re within a couple of hours of eating. Most hikers find that 5–10 minutes of cold soak time is plenty to achieve the perfect pudding texture.
Overwatering
- The problem: It’s easy to go overboard and end up with dessert soup.
- The fix: Start with a little less water than you think (this recipe requires 3 oz of water per serving), then add a splash more if needed. You can always loosen it—thickening it back up? Not so much.
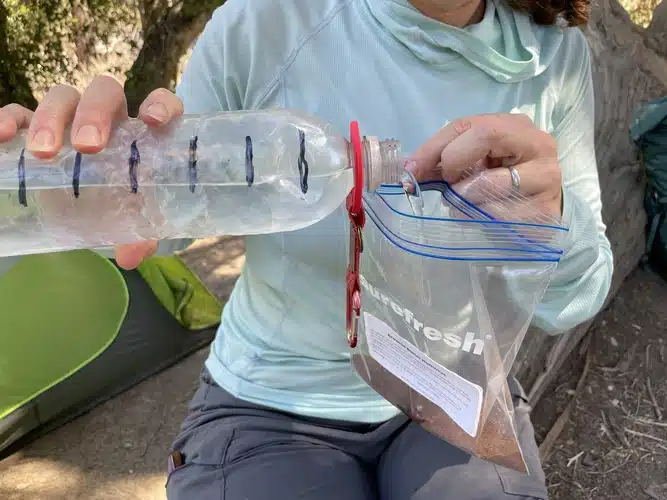
Trail Tip: I mark 4 oz increments on my water bottle and use those lines as a guide when adding water to backpacking meals and drinks. It’s a foolproof way to avoid overwatering on the trail.
Crushed or Soggy Cookies
- The problem: Wafers get pulverized in your pack or soggy if stored in the mix.
- The fix: Store cookies separately in a snack bag or small container. Add them right before eating for that perfect crunch.
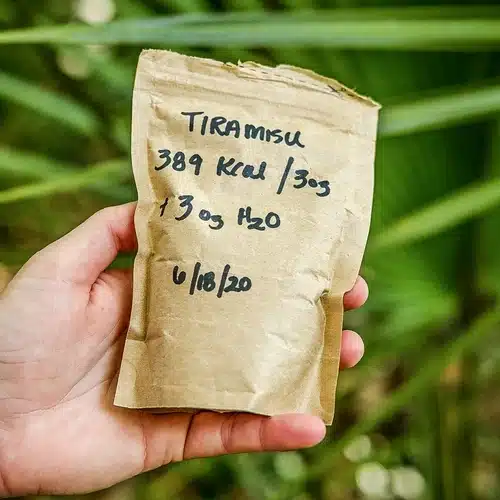
Not Labeling Your Mix
- The problem: Forgetting what’s in a bag of white powder? Not great on trail.
- The fix: Write “Tiramisu” and serving size right on the baggie with a Sharpie so there’s no second-guessing when hunger hits.
Trail Tip: When labeling homemade backpacking meals, use the best-by date of the ingredient that expires soonest. For example, if your pudding mix is good for 8 months but your milk powder expires in 2, label the meal with an expiration date using the 2-month date. That way you don't unexpected pack an expired meal.
More Dessert Ideas for Backpacking (When One Just Isn’t Enough)
Once you’ve tried Trailside Tiramisu, it’s hard to go back to plain old energy bars for dessert. Luckily, there are plenty of other lightweight dessert recipes that deliver serious flavor without weighing down your pack.
If you’re looking for simple dessert ideas for backpacking, here are a few to try:
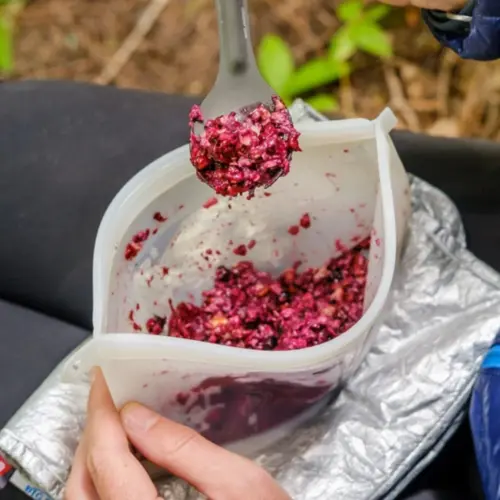
Berry Breakfast Crumble
- Our Berry Breakfast Crumble recipe doubles as breakfast and dessert. It’s sweet, crumbly, and built for cold soak. Made with freeze-dried berries and granola, it’s easy to prep and satisfying any time of day.
Chocolate Peanut Butter Bark
- Simple, high-calorie, and shelf-stable. Melt chocolate at home, swirl in peanut butter, sprinkle with trail mix or freeze-dried fruit, then break into pieces. A favorite for zero-cook hikers.
No-Bake Trail Cookies
- Cookies on trail without an oven? Yes, it’s possible. These no-bake trail cookies are a backpacker favorite because they’re quick to make, pack dense calories, and satisfy a sweet tooth without extra gear. With oats, nut butter, and chocolate, they double as both dessert and an energy boost for the next climb.
Trailside Pudding Parfaits
- A build-your-own dessert idea: instant pudding base + crushed cookies + toppings like freeze-dried bananas or nut butter powder. Pack components separately, assemble trail-side in under 2 minutes.
Want even more options?
You’ll find dozens of ultralight backpacking desserts and cold soak recipes inside the Backcountry Foodie Recipe Library—plus tools to calculate calories, customize macros, and plan entire menus for multi-day trips.
Not sure what to pack next? Try filtering recipes by calorie density, dietary needs, or cold soak prep right inside the library.
FAQs: Best Backpacking Dessert Recipes
What makes Trailside Tiramisu the best backpacking dessert?
- Trailside Tiramisu is lightweight, high-calorie, and requires no stove or cleanup. It offers real comfort food flavor with minimal prep, making it a standout among trail desserts.
Can I cold soak the Trailside Tiramisu backpacking dessert?
- Yes! This recipe is designed specifically as a cold soak dessert. Just add cold water to the dry mix, shake, and let it sit for 5–10 minutes before eating.
Is this dessert good for long-distance or thru-hikes?
- Absolutely. All ingredients are shelf-stable and pack-friendly, making it ideal for extended trips. It also has high caloric density, which is key for longer hikes.
How do I keep the cookie layer from getting soggy?
- Pack the wafers or cookies separately and add them right before eating. This preserves their crunch and prevents them from turning to mush during storage or soaking.
Can I make this recipe vegan or dairy-free?
- Yes—just swap the milk powder for a plant-based alternative like coconut or cashew milk powder, and use dairy-free pudding mix and cookies.

Take This Recipe — and More — on Your Next Adventure
Trailside Tiramisu is just one of over 250 ultralight, nutrient-dense recipes in the Backcountry Foodie Recipe Library — built by a registered dietitian who hikes the miles herself.
Get instant access to the full library and start planning lighter, healthier, happier trips: Join Backcountry Foodie


13 Comments
Is it a one-to-one replacement if using coconut milk powder instead of regular milk powder?
That’s a great question. I’ve not used coconut milk powder with this recipe. So, I’m uncertain. Something to be aware of. Coconut milk powder doesn’t rehydrate well with cold water. In my experience, it remains clumpy and does not achieve the same smooth consistency as dairy powder. Coconut milk powder rehydrates beautifully with hot water.
We tried it at home tonight. Great! But we may buy one of those sample bottles of Kahlua to add to it on the trail. Wouldn’t that be awesome!
Can’t wait to try this this Spring
Question, and this may be a silly one. But it says to mix ALL ingredients minus the wafers, does this include the water as well, or is the water mixed in when you’re ready to eat it? Just want to make sure I prep it right before packing.
Good question and thank you for pointing it out. When the recipe was originally uploaded to the site, water wasn’t included in the ingredients list. When water was added later, I forgot to change the instructions to say, “Put all DRY ingredients…”. I’ll go back and make sure the other recipes are updated as well. Thanks.
Would this work with nonfat milk powder?
Absolutely! Nonfat milk powder would work just fine.
Is the amount of milk powder really correct at 1 cup? There are 12 oz. of water in the recipe, and my whole milk powder tells me to use 3/8 cup of powder with that amount in order to make the equivalent of whole milk.
Great questions! Yes, the measurement is correct at 1 cup of milk powder split over four (1/4 cup milk each) servings with 3 oz water added per serving (12 oz total). Disregard the milk preparation instructions on the container. The amount of water needed to rehydrate recipes is dependent upon the ingredients used and rarely matches the instructions. For example, I always use less water than what is recommended when making smoothies to create the smoothie consistency. Thanks for asking. 🙂
What do you mix and shake it in? Thx
I add water to the zipper-top baggie it’s stored in, shake it, and eat from it.
Wow. This is delicious! Can’t wait to take it on trail. Thanks for the great recipe!